How to Create a Digital Service Menu for Your Salon
Updated:
If a potential client lands on your Instagram profile or Google listing and can't quickly find what you offer or what it costs, there's a good chance they'll book somewhere else. A clear, professional digital service menu fixes that problem instantly — and it does a lot more than just list prices.
This guide walks you through exactly how to create a digital service menu for your salon, barbershop, nail studio, or spa: what to include, how to structure it, how to get it in front of clients, and how to keep it working for you over time.
Why a Digital Service Menu Matters
A printed service menu taped to your front desk is fine — but it has real limitations. It can't be updated without reprinting. It can't be shared on social media. It doesn't show up in Google searches. And it disappears the moment a client walks out the door.
A digital service menu, on the other hand, lives online. Clients can browse it before they even call you. It can include photos, descriptions, add-ons, and pricing that you update in minutes. And when you pair it with a QR code, it becomes an in-salon tool that replaces the laminated sheet entirely.
Here's what a well-built digital menu actually does for your business:
- Reduces time spent answering the same questions. "How much is a balayage?" stops being a phone call when the answer is one tap away.
- Sets client expectations before they arrive. Clients who understand your services and pricing before booking are less likely to be surprised — or to no-show.
- Makes you look more professional. A polished digital menu signals that you run a serious business, not a side hustle.
- Supports upselling. When clients can see your full service list — including add-ons and upgrades — they're more likely to book more.
- Works as a marketing asset. You can link to it from your Instagram bio, Google Business Profile, and booking confirmations.
What to Include in Your Salon Service Menu
Before you build anything, you need to decide what goes on the menu. This is where most salon owners either over-complicate things (listing every micro-variation of every service) or under-deliver (just a bare list of names and prices with no context).
Service categories
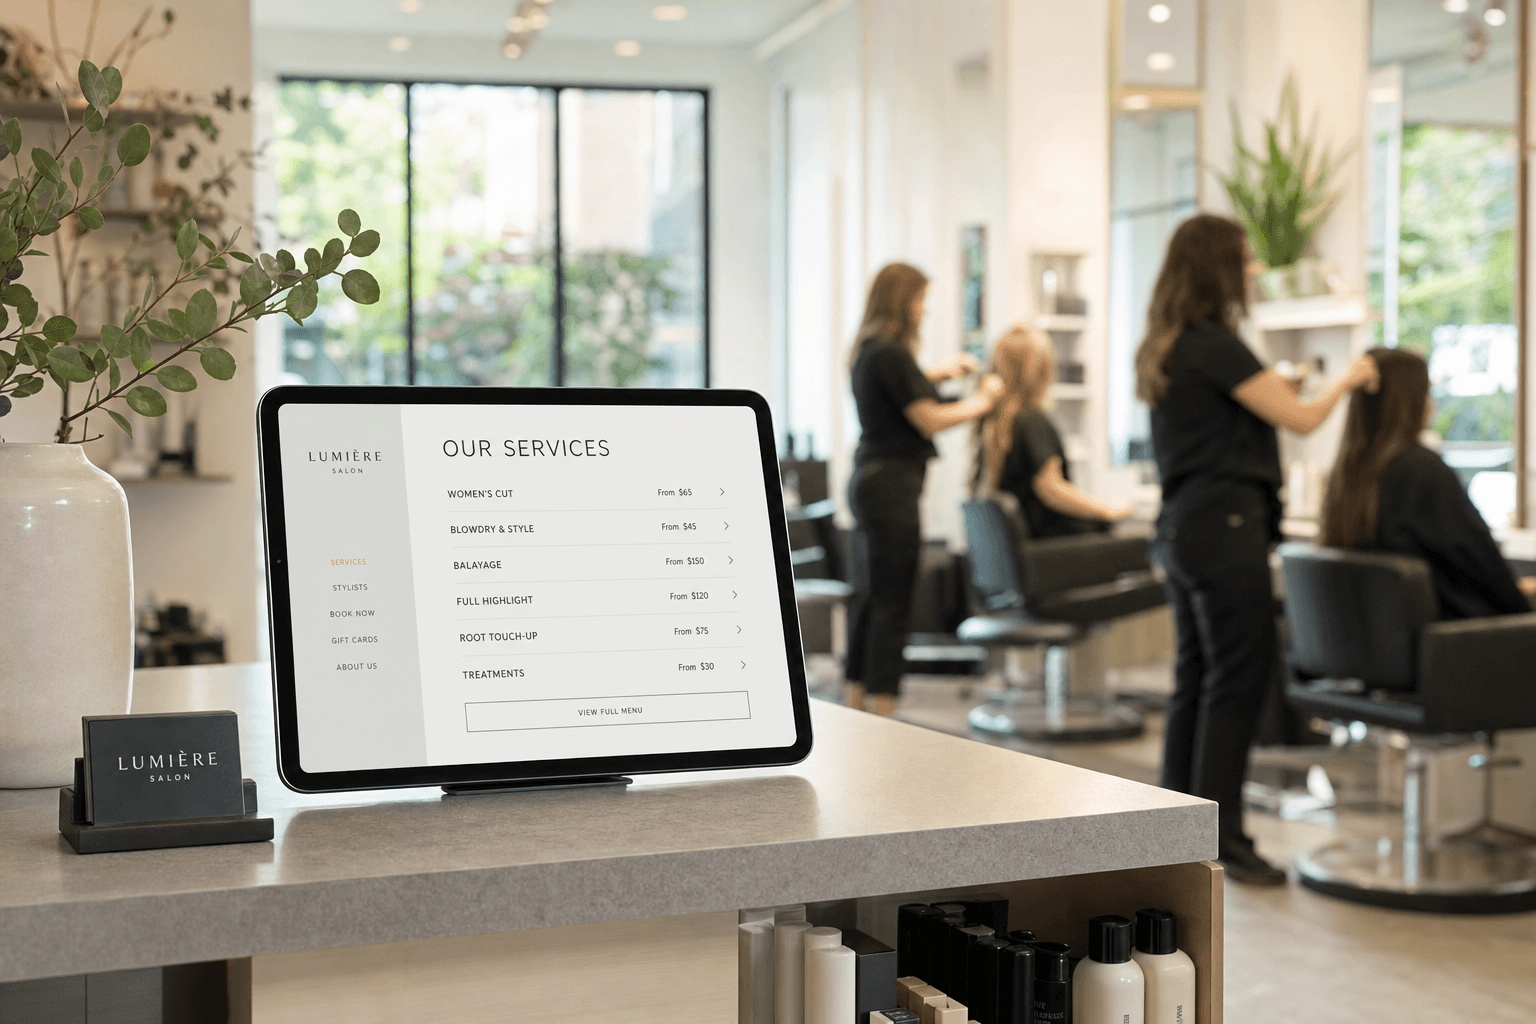
Group your services into logical categories so clients can navigate quickly. For a hair salon, that might look like: Cuts, Color, Treatments, Styling, Extensions. For a nail salon: Manicures, Pedicures, Nail Art, Enhancements. For a spa: Facials, Massages, Body Treatments, Waxing. Keep category names short and obvious — don't make clients guess what "Transformation Services" means.
Service names and descriptions
The name alone is rarely enough. A one- or two-sentence description helps clients understand what they're getting and whether it's right for them. "Balayage — A freehand color technique that creates natural-looking, sun-kissed highlights. Best for clients wanting a low-maintenance color with soft grow-out." That's all you need. Clear, useful, no fluff.
Pricing
Display your prices. This is non-negotiable. Hiding prices doesn't protect you from price shoppers — it just frustrates the clients you actually want. If pricing varies by stylist level or hair length, say so: "Starting from $85 — final price confirmed at consultation." That's honest and professional.
Duration
Including approximate service times helps clients plan their day and reduces late arrivals. It also subtly communicates the value of a service — a 90-minute deep conditioning treatment sounds worth more than one with no time listed.
Photos (where relevant)
For color services, nail art, and certain spa treatments, a photo can do more than a paragraph of text. Use real photos from your own work whenever possible. Stock images are better than nothing, but authentic portfolio shots build trust faster.
Add-ons and upgrades
List your add-ons clearly alongside the services they complement. A deep conditioning treatment added to a color service, a paraffin wax upgrade on a pedicure, a scalp massage added to a cut — these are easy revenue wins when clients can see them laid out on the menu.
How to Build Your Digital Menu: Step by Step
Step 1: Audit your current service list
Before you build anything digital, get your service list right on paper first. Write out every service you offer, its price, and its approximate duration. Remove anything you've stopped offering. Consolidate any redundant variations. This exercise alone often reveals that your current pricing hasn't been updated in two years.
Step 2: Choose the right tool
You don't need a web developer or a complicated booking platform to create a professional digital menu. MenuHoster's salon menu builder lets you create a clean, mobile-friendly service menu in under an hour — no coding required. You get a shareable link, a QR code, and a menu that looks great on any device.
When evaluating any tool, look for these features:
- Mobile-optimized display (most of your clients will view it on their phones)
- Easy editing — you should be able to update prices yourself in seconds
- A shareable URL you can post anywhere
- Built-in QR code generation
- Professional templates that match your brand
Step 3: Pick a template and set your branding
Your digital menu should feel like an extension of your salon's brand — not a generic price list. Choose a template that matches your aesthetic. A minimalist barbershop and a luxury day spa need very different visual treatments. Set your brand colors, upload your logo, and choose a font that matches your existing materials. Browse MenuHoster's templates to find one that fits your style without starting from scratch.
Step 4: Enter your services
Work through your categories one at a time. For each service, add: the name, a short description, the price (or starting price), and the duration. Resist the urge to list every single micro-variation — if you have 12 different balayage options, consider grouping them under one entry with a note that pricing varies based on length and technique.
Step 5: Add photos
You don't need a photo for every service, but adding images to your top five or six most popular services makes a real difference. Use your phone to photograph your best work in good natural light. Crop consistently and keep the style cohesive. Even a handful of quality photos elevates the whole menu.
Step 6: Preview on mobile
Before you publish, pull up the menu on your own phone and walk through it as if you were a new client. Is everything readable? Do the prices display correctly? Are the category names clear? Fix anything that feels confusing or hard to read on a small screen.
Step 7: Publish and generate your QR code
Once you're happy with the menu, publish it and grab your QR code. With MenuHoster's QR code menu generator, your code is automatically linked to your live menu — so any updates you make are instantly reflected when clients scan it. No reprinting, no outdated information.
Where to Use Your Digital Menu
A digital menu only creates value if clients can find and use it. Here are the most effective places to deploy it:
- Your Google Business Profile. Add the menu link to your GBP listing. Clients searching for your salon on Google can see your services before they even click through to your website.
- Your Instagram bio. Replace the generic link with your menu URL, or add it to your Linktree alongside your booking link.
- Booking confirmation emails and texts. Include the menu link so clients can review services and add-ons before their appointment.
- In-salon QR codes. Print your QR code and display it at the reception desk, in the waiting area, and at each styling station. Clients waiting for color to process are a captive audience — give them something to browse.
- Your website. If you have a website, embed the menu or link to it prominently from your homepage and services page.
- Social media posts. When you post about a service, link to that service on your menu. "Swipe up to see our full color menu" is more useful than just a pretty photo.
Keeping Your Menu Accurate and Up to Date
An outdated digital menu is worse than no menu at all. If a client books based on a price that's no longer accurate, you're starting the appointment with friction. Set a recurring reminder — quarterly at minimum — to review your menu for accuracy. Update prices before they go into effect, not after. Remove discontinued services immediately.
The advantage of a digital menu over print is that updates take minutes, not days. Use that advantage. If you raise prices in January, your digital menu should reflect that on January 1st. If you add a new service after a training course, it should be on the menu that week.
Common Mistakes to Avoid
Listing too many options
Decision fatigue is real. If your menu has 60 line items, clients will either give up or default to the cheapest option. Aim for clarity over comprehensiveness. Group similar services, use add-ons for variations, and save the deep detail for consultations.
Skipping descriptions
A menu that just lists "Keratin Treatment — $150" leaves clients guessing. What does it do? How long does it last? What's the process? A two-sentence description answers these questions and reduces pre-appointment anxiety.
Inconsistent pricing between channels
If your digital menu says $75 for a cut and your receptionist quotes $85, you've created a trust problem. Make sure your menu, your booking system, and your front desk are all aligned on pricing at all times.
Not mobile-optimizing
If your digital menu is a PDF or a desktop-only webpage, most clients will have a frustrating experience. A mobile-first menu — one that loads fast, is easy to scroll, and has readable text without zooming — is essential. This is one of the core reasons to use a purpose-built tool like MenuHoster's digital menu platform rather than a static document.
Forgetting to link it anywhere
Building a menu and then not telling anyone about it is the most common mistake. The menu is only valuable if clients can find it. Spend 20 minutes after launch adding the link to every place a potential client might look for you.
Frequently Asked Questions
Do I need a website to have a digital salon menu?
No. A digital menu is a standalone page with its own URL that you can share anywhere — your Instagram bio, Google Business Profile, or via text message. You don't need a full website. Many salons use a digital menu as their entire online presence for services and pricing.
How often should I update my digital service menu?
At minimum, review your menu every quarter. Update prices immediately when they change, add new services within a week of launching them, and remove discontinued services right away. The beauty of a digital menu is that updates are instant — there's no reason to let it go stale.
Should I include prices on my salon menu?
Yes. Transparent pricing builds trust, reduces time spent on pricing inquiries, and attracts clients who are ready to book. If pricing varies (by hair length, stylist level, etc.), use "starting from" language and note that final pricing is confirmed at the appointment or consultation.
Can I use a QR code for my salon menu in-salon?
Absolutely — and it works very well. Print your QR code and display it at reception, in the waiting area, and at styling stations. Clients can scan it to browse your full service list, explore add-ons, and even share it with friends. When you update your menu, the QR code automatically points to the latest version.
What's the difference between a digital menu and an online booking page?
A digital menu displays your services, descriptions, and pricing — it's a browsable reference. An online booking page is where clients schedule appointments. They serve different purposes, but work best together: link from your digital menu directly to your booking page so clients can go from browsing to booking in one flow.
Ready to build a professional digital service menu for your salon? Get started with MenuHoster's salon menu builder — it's free to try, takes less than an hour to set up, and gives your clients a polished, mobile-friendly experience from day one. Check out MenuHoster's pricing plans to find the right fit for your business.
MenuHoster Team
Helping restaurants go digital