QR Code Menu Table Tents: Sizing, Materials, and Design
Updated:
A QR code menu is only as good as the physical object that carries it. You can build a beautiful digital menu, but if the table tent holding the QR code is the wrong size, printed on flimsy stock, or designed so poorly that guests ignore it, scan rates will disappoint you. This guide covers everything you need to know about table tent sizing, material choices, and design so your QR codes get noticed and used.
Why Table Tents Still Matter for QR Menus
It might seem ironic: you go digital to reduce print costs, yet you still need a physical prompt. That physical prompt is the bridge between a guest sitting down and your digital menu loading on their phone. Without a well-placed, well-designed table tent, many guests simply won't know a QR menu exists—or won't bother scanning it.
Table tents have a few advantages over stickers on the table or laminated cards slipped under a glass:
- Vertical visibility: A standing tent is in the guest's sightline the moment they sit down.
- Two-sided real estate: You can put the QR code on one panel and a promotion, Wi-Fi password, or loyalty program on the other.
- Easy swaps: Seasonal promotions, new menu launches, or updated QR codes just require reprinting the insert—not replacing hardware.
If you haven't yet built your digital menu, start with a QR code menu generator before worrying about the physical holder. The QR code itself needs to point somewhere great.
Standard Table Tent Sizes
There is no single "right" size, but there are industry standards that work well in most dining environments. Here's a breakdown of the most common formats:
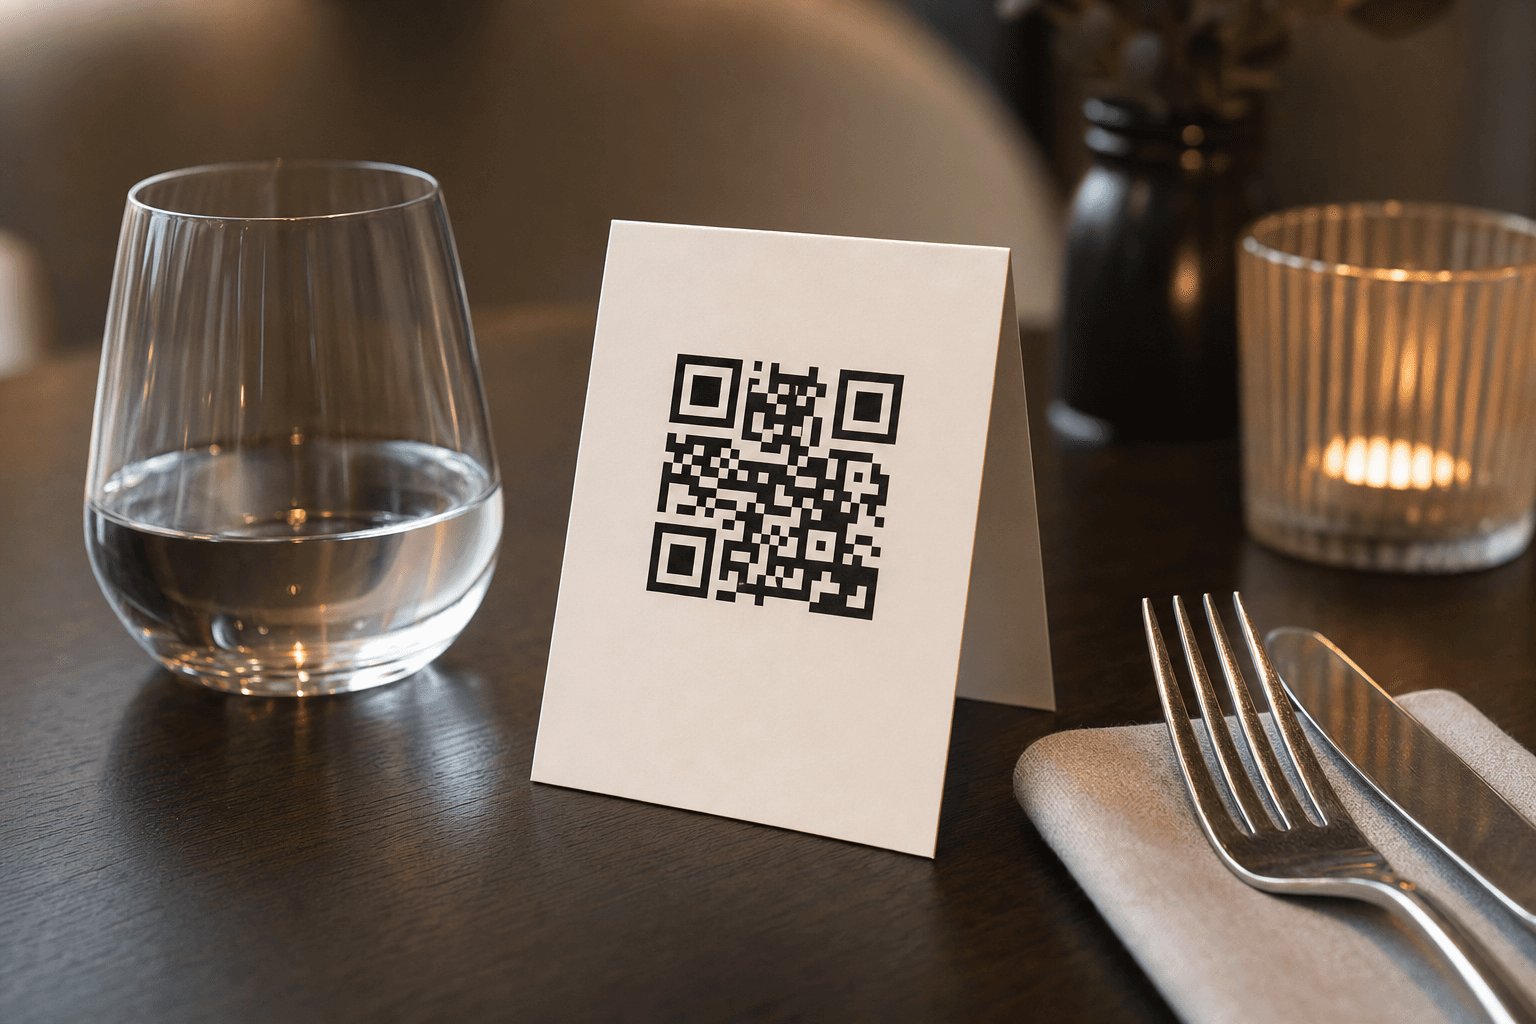
4″ × 6″ (Landscape or Portrait)
This is the most popular size for casual dining, cafes, and bars. It's large enough to hold a scannable QR code (ideally 1.5″–2″ square) plus a short line of instructional copy without crowding the table. A landscape fold creates a low, wide profile; a portrait fold stands taller and is harder to knock over.
3.5″ × 5″
A compact option that works well on small café tables, bar tops, or food truck counters where space is tight. At this size you need to be disciplined—QR code, one line of instruction, your logo. Nothing more.
5″ × 7″
Better suited to full-service restaurants where you want to include a promotional message, a featured dish photo, or a loyalty program call-to-action alongside the QR code. It can feel bulky on small tables, so use it selectively.
A-Frame (Double-Sided) vs. Single-Panel
A classic A-frame tent folds in half to create two equal panels. A single-panel card (essentially a thick postcard displayed in a clear acrylic holder) is another option—it gives you a flat print surface and the holder can be reused indefinitely. Either works; the A-frame is cheaper to produce in bulk, while the acrylic-plus-insert approach looks more premium and is easier to wipe clean.
The Minimum Scannable QR Code Size
This is where many operators make a costly mistake: printing the QR code too small. As a rule of thumb, the QR code should be at least 1.2″ × 1.2″ (about 3 cm × 3 cm) for reliable scanning from a typical table distance of 12–18 inches. On a 4″ × 6″ tent, a 1.75″ code is comfortable and leaves room for copy.
A few other sizing rules:
- Maintain a quiet zone: Leave a white (or same-color-as-background) margin of at least 4 modules (the small squares that make up the code) around all four sides. Cropping into this margin breaks scans.
- Test before you print 200 copies: Print one proof, place it on an actual table, and scan it with three different phones—an older Android, a recent iPhone, and a mid-range device. If all three scan in under three seconds, you're good.
- Use a high error-correction level (H or Q): This allows the code to scan even if it gets slightly scratched or stained—inevitable in a restaurant environment.
Materials and Finishes
The material you choose determines durability, cost, and how the QR code scans under different lighting conditions.
Standard Cardstock (80–110 lb Cover)
The most affordable option. Works fine for short-term use (a seasonal menu, a pop-up, a trial run). Downsides: absorbs moisture, creases easily, and needs frequent replacement in busy environments. If you go this route, print on 100 lb cover weight minimum—anything lighter feels cheap and curls.
Laminated Cardstock
A thin laminate layer dramatically extends the life of a paper tent. Matte laminate is preferable to gloss for QR codes because gloss creates glare under overhead lighting, which can interfere with camera autofocus and reduce scan rates. Always choose matte laminate for the panel containing the QR code.
Synthetic / Waterproof Paper (e.g., Yupo)
Synthetic paper is tear-resistant, fully waterproof, and can be wiped down with sanitizer repeatedly without degrading. It costs roughly 2–3× more than standard cardstock but lasts months instead of weeks. For high-volume restaurants with frequent table turns, the math usually favors synthetic paper within the first month.
Rigid PVC or Acrylic
Printed PVC cards (similar to a credit card in thickness) or acrylic stands with printed inserts are the most durable option. PVC cards are nearly indestructible and can be sanitized with anything short of bleach. Acrylic holders with swappable paper inserts let you update the menu link or promotion without replacing the stand. These are worth the investment for fine dining or any venue where the physical presentation matters as much as the food.
Chalkboard or Wooden Tents
Some cafes and gastropubs use small chalkboard A-frames or laser-engraved wooden blocks with the QR code printed on a sticker or small card attached to the face. These look great for rustic or artisan branding but require more maintenance and are harder to update. Use them if brand aesthetic is a priority, but make sure the QR code surface is flat and non-reflective.
Design Principles That Drive Scans
A table tent is a micro piece of marketing. Every element should serve one goal: get the guest to point their camera at the code. Here's how to design for that outcome.
Lead with the Benefit, Not the Action
Instead of "Scan to view menu," try "See the full menu + today's specials →" or "Scan for the menu, allergen info & more." Guests are more likely to scan when they understand what's in it for them. One line is enough. Two lines maximum.
High Contrast is Non-Negotiable
The QR code must have strong contrast between the dark modules and the light background. Black on white is the gold standard. Dark navy on cream works. Dark green on kraft paper can work if the contrast ratio is high enough—test it. Never print a light-colored code on a white background, and avoid placing the code over a photograph or textured background.
Brand It, But Don't Clutter It
Adding your logo inside the QR code (most generators support this) or placing your logo above the code reinforces brand recognition. But resist the urge to add your full address, phone number, social handles, and a photo of your best dish all on the same face. That information lives in your digital menu—the table tent's only job is to get guests there.
Typography
Use one font, two weights maximum. The instructional line should be large enough to read without squinting—14 pt minimum on a 4″ × 6″ tent. Your restaurant name or logo can be larger. Avoid decorative scripts for the instructional copy; clarity beats personality here.
Color and Finish Alignment
The table tent should feel like it belongs in your restaurant. Match your brand palette. If your restaurant uses warm earth tones, a stark white tent with a black QR code might scan reliably but look out of place. A warm cream background with a dark brown code can achieve the same contrast while fitting your aesthetic. Just confirm contrast with an actual print before committing to a large run.
For more on designing menus that influence behavior, see our guide on creating an effective digital menu—the same principles apply to the physical touchpoint.
What to Include on Each Panel
A standard A-frame tent has two panels. Here's a practical allocation:
- Front panel: Logo, QR code, one-line instruction (e.g., "Scan to view our menu"), and optionally a "No app needed" reassurance line. That's it.
- Back panel: One secondary call-to-action. Options include: Wi-Fi network and password, a loyalty program sign-up, a featured cocktail or special, a Google review prompt, or your social handle. Pick one—not all of them.
If you're using a single-panel card in an acrylic holder, put the QR code on the front and accept that the back is hidden. That's fine—the holder itself signals professionalism.
Placement on the Table
Even a perfectly designed table tent fails if it's in the wrong spot. Place it:
- Center of the table for 2-tops and 4-tops, where it's equidistant from all guests.
- Near the edge closest to the aisle for booths, so guests see it as they slide in.
- At eye level at the counter for bar seating—prop it against a condiment holder or use a weighted base.
Avoid placing it where it will be immediately pushed aside by a water glass or bread basket. A tent that ends up face-down on the table within 30 seconds of seating is a tent that doesn't get scanned. For a deeper look at scan-rate optimization, read our article on where to place QR code menus for maximum scans.
Printing and Production Tips
Print Resolution
Export your QR code at a minimum of 300 DPI for print. Many online QR generators export at 72 DPI (screen resolution), which will look pixelated and may not scan reliably when printed. Download an SVG or high-resolution PNG and confirm the file resolution before sending to your printer.
Local Print Shop vs. Online Printer
For small runs (under 50 tents), a local print shop gives you faster turnaround and the ability to check a physical proof before committing. For larger runs, online printers (Vistaprint, Canva Print, GotPrint, Primoprint) offer significantly lower per-unit costs. Always order a physical proof copy first—color on screen rarely matches color in print exactly.
Batch Updates
If your menu URL changes (e.g., you move from a PDF link to a proper digital menu), your QR code changes too, and every printed tent becomes obsolete overnight. The easiest way to avoid this: use a short link or redirect URL that you control. That way, the QR code printed on your tents always points to the same short URL, and you simply update where that URL redirects. Most QR menu platforms, including MenuHoster, handle this automatically—your code never changes even when your menu does.
If you're currently sending guests to a static PDF, consider upgrading to a proper contactless menu that's mobile-optimized, always up to date, and doesn't require a PDF viewer.
Cost Expectations
Here's a rough cost guide for a 4″ × 6″ A-frame tent at typical print quantities:
- Standard cardstock, no laminate, 50 units: $0.30–$0.60 per tent
- Matte-laminated cardstock, 100 units: $0.50–$1.00 per tent
- Synthetic waterproof paper, 100 units: $1.00–$2.00 per tent
- Rigid PVC cards, 100 units: $1.50–$3.00 per card
- Acrylic holders (reusable) + paper inserts: $3–$8 per holder, $0.10–$0.20 per insert
For a 20-table restaurant, the total investment for quality laminated tents is typically $20–$50—a negligible cost compared to printing and reprinting full paper menus every time prices change.
Frequently Asked Questions
What is the best size for a QR code menu table tent?
For most restaurants and cafes, a 4″ × 6″ A-frame tent is the sweet spot. It's large enough to hold a scannable QR code and brief copy without overwhelming small tables. If your tables are very small (espresso bar counters, cocktail tables), step down to 3.5″ × 5″. For full-service dining where you want to include promotional content, 5″ × 7″ works well.
What material should I use for restaurant table tents?
For most restaurants, matte-laminated cardstock (100 lb cover) offers the best balance of cost and durability. High-volume restaurants with frequent table turns should consider synthetic waterproof paper or rigid PVC cards—both withstand repeated sanitizing and last significantly longer than standard cardstock.
How big does the QR code itself need to be to scan reliably?
At minimum, 1.2″ × 1.2″ (about 3 cm × 3 cm). For a 4″ × 6″ tent, 1.75″ is comfortable. Always maintain a clear quiet zone (white margin) around the code, use high error-correction (level H or Q), and test with multiple devices before printing in bulk.
Should I use gloss or matte laminate on my table tents?
Always use matte laminate on the panel containing the QR code. Gloss laminate creates glare under restaurant lighting, which can confuse phone cameras and reduce scan rates. Matte finish also tends to look more upscale in a dining context.
What happens to my printed table tents if I update my menu?
If you use a platform that provides a stable, redirect-based QR code (like MenuHoster), your printed tents stay valid indefinitely—you update the menu behind the scenes and the code never changes. If you generated a one-time QR code pointing directly to a specific URL, changing that URL means reprinting everything. This is one of the strongest reasons to use a dedicated QR menu platform rather than a generic QR generator.
Ready to put a great digital menu behind your table tents? Create your QR code menu with MenuHoster in minutes—no design skills required, no app for guests to download, and your menu link stays stable even when you update prices or add new dishes. Start free and have your first table tent–ready QR code live today.
MenuHoster Team
Helping restaurants go digital